Wednesday

How to Build a Fence - Step by Step Guide

This post will show you how you can easily build a fence.  Fences add both security and privacy to your property.  When they are well made and finished then they will certainly improve the aesthetics of your home.   Did you know that beautiful fences can even be made inexpensively from recycled materials such as pallets?  Yes, the humble pallet can be stripped and the wood used as the panelling material for the fence.


Step 1 - Materials and tools needed

Materials:
  • Fence railings (from pallets)
  • Fence posts
  • Deck screws
  • Fence post caps
  • Dry Concrete Mix
  • Water
  • Galvanised nails
  • Wooden stakes
Tools:
  • Shovel
  • Post hole digger
  • Sledge hammer
  • Safety glasses
  • Rubber gloves
  • Screwdriver
  • Pencil
  • Drill
  • Tape measure
  • Spirit Level
  • Powdered chalk
  • String line
  • Hammer or mallet


Step 2 - Mark the positions of the fence posts

This step involves laying out the direction of your fence and the distance between the fence post intervals.  The best way to do this is to decide your starting point and your end point and hammer a wooden stake at both points.  Then tie a line between the two stakes tightly.  Then run your powered chalk over the line.  Then remove the masons line.


Using your tape measure determine the distance between the start and end points.  Then divide this distance evenly ensuring that the maximum distance between the divisions is no more than 8'.  Again mark out these divisions using powdered chalk.  These will be the locations of the fence posts.

Step 3 - Dig the Holes for the Fence Posts

The holes for the fence post holes must be dug at the locations marked in step 1.  The holes should be approximately twice as wide as the fence post and one third as deep as the fence post is long.  The holes are dug using the post hole digger.


Step 4 - Add gravel and concrete to fence post holes

The base of the fence post will be subject to waterlogging which will lead to wood rot.  In order to provide adequate underneath the fence post a 6" gravel base is laid onto which the fence post will stand.
 
Concrete is then poured around the fence post.  The fence post is plumbed up using the spirit level.  Don't forget to check for plumbness in both directions i.e. left to right and front to back.  It is a good idea to start with the start and end fence posts (once the concrete has hardened of course) and string a line between these posts.  This will give you a guide for the rest of the fence posts.
 

Step 5 - Attach rails to fence posts

Once the concrete has hardened, it is time to attach the rails or panels to fence posts.  The rails are the part of the fence to which the panels will be nailed or screwed.  Three would be a suitable number of rails.  One for the top, bottom and middle.


Step 6 - Attach pickets or panels to rails

Once the rails are secured the pickets may be attached.  The pickets may be made from stripped pallets assuming that they are long enough. The pickets are attached using decking screws or galvanised nails.


Step 7 - Attach fence post caps

Attach the fence posts cap using a mallet.


Step 8 - Finish with fencing paint


Conclusion:

I hope that you have a go at building a fence.  You will receive massive amounts of job satisfaction from building these.  Selling the individual fence panels or even offering fence repair service is also a good business opportunity.  Happy woodworking!


Monday

How to Build a Picnic Table - Step by Step Guide

This post will show you how to build a picnic table exactly like the one shown in the photo below.  I think this picnic table would make a wonderful addition to your outdoor summer experience at home.  When correctly built and finished you will be able to enjoy this woodworking project for many years to come.  I built mine using everyday woodworking tools that could be bought very cheaply second hand or borrowed from a neighbour.  I used plans that I downloaded and were essential when it came time to build my picnic table.  Just follow the step by step guide below and it will teach you everything you need to know about building a picnic table.

You can make this picnic table, just keep reading!

Step 1:  Materials list and tools used

The materials used were bought at my local hardware store quite cheaply:
  • 2x4s
  • 2x6s
  • 2x8s
  • 3" x 3/8" galvanised carriage bolts
  • 2 1/2", 3" and 4" inch decking screws
  • Outdoor wood varnish
Thankfully all the tools I needed, I already owned:
  • Circular saw
  • Sabre saw
  • 3m tape measure
  • Framing square
  • Combination square
  • Cordless drill and an assortment of bits
  • C-clamps and bar clamps
  • Ratchet set
  • Paint brushes
  • Safety specs
  • 120 and 220 grit sandpaper

Terminology used in the guide


Step 2:  Cutting the legs to length

Cut the table slats to length with a circular saw

Cut the legs to length using a circular saw.  Clamp your framing square at 60 degrees to the end of the 2x8 and use this as a fence to run your circular saw against to ensure a perfect 60 degrees.  Obviously, you need to do this 8 times.


Step 3:  Cutting the table slats

Cut the table slats to length from a 2x8.  The top edges of the slats may be rounded off using a router or giving a light run with a smoothing plane.

Step 3: Prepare the end table and centre table supports

This involves cutting a 60 degree angle on the ends of the supports.  This cuts down on weight slightly and makes for a more 'knee friendly' table.

Step 4: Creating the picnic table top


The table top assembly requires the two
end table supports and the centre table
support.  Spacers are used in between the slats, during assembly, to allow a space between the slats for rainwater drainage while maintaining a practical table
surface.
            Drill pilot holes, 2 for each slat on both end table supports and the centre support.  Countersink the holes so that the screw head finishes flush with the bottom surface of the supports.
            Screw the supports to the table slats.  You may use a wood glue if desire for extra rigidity.

 Step 5: Attaching the legs

Clamp the legs to the outside faces of the end table supports 
Clamp the legs in place and position them on each of the centre slats and on the outer face of the end support faces.  The legs will be attached with some galvanised carriage bolts with washers.  It is very important to use galvanised elements as they resist corrosion and ensure that your table will be held together securely.
Attach the legs with two 3-inch carriage boltsDrill some clearance holes for the bolts.  It is a good idea to drill clearance holes which are very slightly smaller than the bolt diameter.  This will make for a very rigid leg structure.  The bolts will be tightened from the inside.  The counterboring ensures that the end of the bolt does not protrude underneath the table and possibly injure somebody while sitting.  Also, ensure that you use a galvanised washer.  This will spread the load applied when tightening the bolt and minimise any puncturing of the wood and prevent any ingress of water into the timber, which will result in premature rotting of the wood.  You can plug the counterbore with some clear silicone after you have finished tightening the bolts.

Step 6:  Attaching the bench supports to the legs

Drill holes on the outside face of each leg to clamp the bench supports to the legsLay one arm of a framing square on the table top and mark the position of the bench supports on the legsMark the position of the bench support and clamp to the legs using a c-clamp.   Mark the position of the holes. Using deck screws and a cordless screwdriver attach the bench supports.

Step 7:  Cut and attach the braces

Drill pilot holes on each brace and then drive in the screws


Using 2x4s cut the braces to length and cut
60 degree angles on both ends.  Centre
the brace on the bench support and drill
pilot holes for the decking screws.

Step 8: Cut the bench cleats and attach

Drill holes on the bench cleats after positioning them at the center of the bench slatsUse spacers to space out the bench slats and fix the bench slats together using the bench cleat.  Clamp the assembly together usingbar clamps.  Drill pilot holes and fix using decking screws.  For extra strength you may choose to use two bench cleats.

Step 9:  Fix the bench to the bench support

Drill holes on the bench supports to screw them on to the benchesPosition the benches onto the bench supports and hold them in place using the c-clamps.  See the position guides in the diagram
Drill pilot holes on the underside of the
bench supports.  Attach the benches to the
bench supports using decking screws.

Step 10: Sand and finish

Apply a waterproof finish after sanding all rough edgesUsing a sanding block and some 120 grit paper give the surfaces a sanding. Sand in the direction of the grain to give a smoother finish.  If you are in a hurry then may choose not to sand on the surfaces that are not visible.  Using a vacuum cleaner suck all the dust off the surfaces.  Using 220 grit sandpaper, sand again.  This should leave a smooth surface. Again vacuum the surface and rub all surfaces with a tack cloth.  Note: A tack cloth is a lint free cloth that has been impregnated with a wax that will grab all bits of dust from your woodworking project.  If you want to stain the wood I would recommend using a pre-conditioner if you have built your picnic table from pine.  The pre-conditioner helps softwoods like pine to stain more evenly.  Once the picnic table has been dusted you may apply a coat of outdoor varnish.  Allow to dry for 24 hours.

Conclusion:

I hope that you have enjoyed this project.  It can be easily done over a weekend and will last for years to come.  If you need some blueprints. I bought a very good set of plans online.

Thursday

How to build an eight player wooden poker table over a weekend

Hello & welcome to my website.

This page will instruct you on how you can build an eight player poker table step by step.  The finished poker table is shown in the photograph below.  The table is octagonal and has cut outs to hold cards, poker chips and beverage cups.  The board is finished with stain and glossy clearcoat varnish; also the playing surface is covered in felt.  All materials are cheap and readily available at any builders providers or hardware store.  This table could easily be made over a couple of weekends depending on your woodworking experience and using modest woodworking tools.  It would make for a very neat addition to any man cave!  I got my poker table plans here.


Finished Poker Table that you can make over a weekend following the instructions on this webpage
 

Step 1 - Materials and Tools

Materials list:

  • 3/4" birch plywood 4' x 8' (2)

  • 3/4" birch plywood 4' x 4' (1)

  • 6'x3" 3/4" thick pine boards (4)

  • 6'x8" 3/4" thick pine boards (4)

  • 2.5 Yards of Hunter Alova Suede

  • 2 yards quilting batting

  • Plastic Cup Holders (8)

  • 3M spray Adhesive 77

  • 1/2" staples

  • 1 box 1/4" Wood Screws

  • 1 box 1/4" Finishing Nails

  • Minwax Stain

  • Minwax Pre-conditioner

  • Minwax Quick-Dry Glossy Polyurethane

  • Elmer's Wood Glue

  • Biscuits

  • 25' Leather Texture 3/4" T-Moulding


 Tools used:
  • Sliding compound mitre saw

  • Circular Saw
  • Cordless drill (with hole saw being the same diameter as your drinks glasses)
 
  • Jigsaw
  • Biscuit jointer


  • Bar clamps
  • Hand held sander


  • Router


  • Staple Gun

  • Biscuit jointer

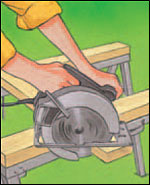
Step 2 - Cutting for each side of octogan

Firstly, start with your 6"x8" 3/4" thick pine boards.  These will be cut into 8 pieces and will form the perimeter of the top surface of the poker table.  These will be routered out later to allow space for cups and chips/cards.


Step 3  - Cutting edge piece/molding

Next take your 6'x3" 3/4" thick long pine boards and using a drop saw or hand saw (with mitre box!)cut them roughly 1" longer than the longest edge of the 8 pieces that you have just cut in Step 2.  These will be nailed and glued along the edge of the table top as a finish molding.


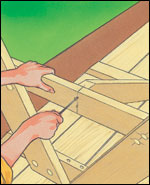
Step 4 - Gluing up each side of octogan

The next step will involve nailing and gluing the pieces cut in step 3 to the pieces cut in step 2.
I did mention that the pieces cut in step 3 ought to be about 1" longer than the longest edge of the piece cut in step 2.  This difference will be split so that the pieces from step 3 will stick out 1/2" on each side of each piece (longest edge) from step 2.  This was to ensure that there is enough material to trim off at the appropriate angle i.e. flush and inline with edges of the pieces made in step 2.  Nails out to be punched below the surface and then later filled with appropriate colored wood filler.


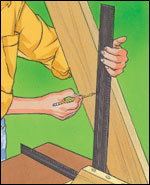
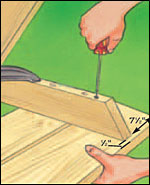
Step 5 - Cutting each side to correct length and angle

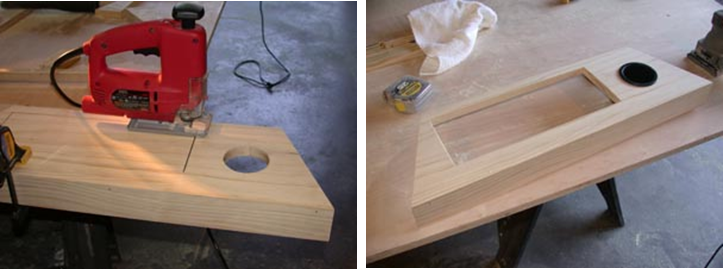
The next step is to trim up the assembly on both sides such that each edge of the assembly is at the same angle.   This is done using the mitre saw.  Please ensure that your mitre saw is at the correct angle.  Double check to be sure!  Run your finger along the cut edge to ensure that the surface is smoothe and the edge of each piece is aligned.
 
 
The image on the right below shows the desired result.


Step 6 - Cutting out for cup holder

Using a hole saw cut a hole wide enough to allow the cup holders to fit snugly.


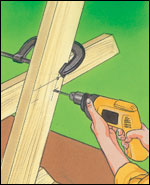
Step 7 - Cutting out for chips storage

The next step involves cutting the rectangular hole out which will allow each player to store his/her chips/cards.  I did this by drilling a hole within the outline of the rectangle to allow the jigsaw blade to get started then slowly and carefully cutting out the material.  Patience is key here, as I would imagine you want a smooth straight finish.  Tip: Clamp a piece of straight edge to run your jigsaw against.  This will ensure a very straight cut.  This isn't shown in the diagram by the way.


Step 8 - Dry Assembly

At this stage, all going well, you should have 8 assemblies exactly like that in the picture above on the right.  It would make very good sense at this stage to dry fit the assembly to ensure that all edges join up with no gaps, if you what I mean.  They then can joined permanently.


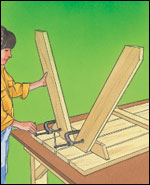
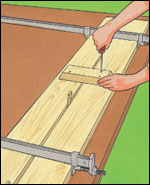
Step 9 - Gluing up final assembly

Assuming that step 8 went well, the next step will be to cut out holes for the biscuits using the jointer and then gluing up the assembly.  The pieces will be held together using clamps in the positions shown on the image on the right below.


Once the glue has dried, the two halves are then glued together on the flat as shown below in the picture.


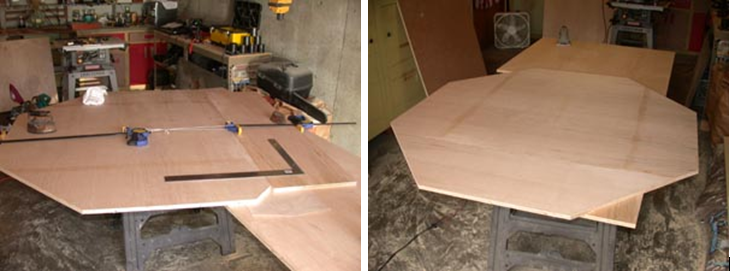
Step 10 - Cut plywood base

The next step is to cut the plywood base onto which the assembly above will sit. 
 
Using the octagon ring made in step 9, measure the inside diameter and this will give you the measurement to mark out the outline of the base onto a sheet of plywood.  I actually had to join two plywood sheets together as one would not suffice.  It's all about measuring twice and cutting once here!


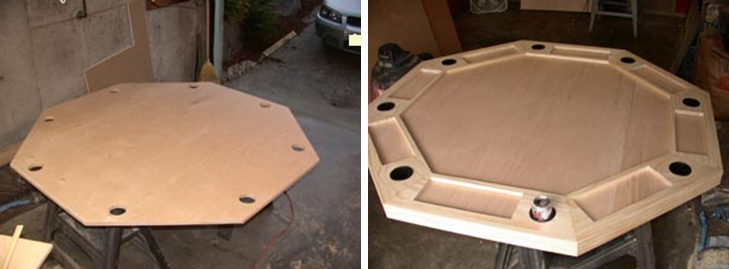
Step 11 - Cutting out for cup-holders in plywood base

The holes for the cup holders will now be cut out in the plywood base.  This is done by fitting the top octagon ring (from step 9) to the plywood base (from step 10) and then using the top holes as a guide for the hole saw to cut holes into the plywood base.


Step 12 - Router the top edges

To give the table top a nice appearance I rounded all the edges with a router and a rounding bit.
 
 
Paying particular attention to the joints, I sanded all the surfaces with 120 grit paper on a hand held sander.  I finished off the sanding with a 220 grit sandpaper.  The surface was very smooth at this stage ready for stain and a finish.  But that will come later.  Next to cut out the centre octagon.
 

Step 13 - Cut out centre octagon

Next, the centre octagon (play surface) is cut out and wrapped up with felt.  This piece is cut using a 4' x 4' sheet of 3/4" birch plywood.  Remembering that batting & felt will be wrapped around this piece it is important that there roughly a 1/8" gap all around to allow for the thickness of the felt.


The batting is glued to the plywood using a spray adhesive.  The edges are then wrapped around the edges and stapled to the other side.  The same is done when gluing the felt (green) to the batting.


Step 13 - Making the foot of the table.

The foot of the table is simply a plywood octagon which can be made to any width you desire.  Mine was made 5/6 the width of the octagon centre piece mad in step 13.

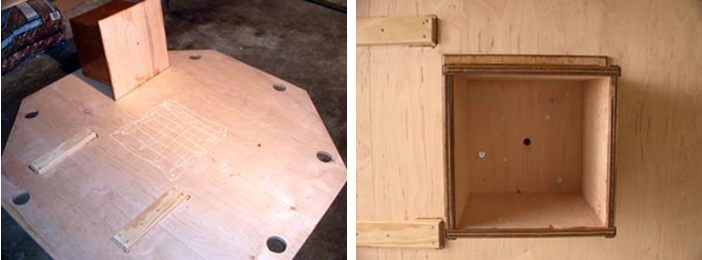
Step 14 - Making the pedestal

The pedestal is the base onto which the table top rests.  The pedestal consists of an upper pedestal and a lower pedestal.  The upper pedestal slides over the bottom pedestal such that the table can be easily dis-assembled and transported from one place to another.


The top (&bottom) pedestal is square and is made from 3/4" plywood.  The pedestal is nailed and glued together.


The bottom pedestal is constructed in the same way as the top pedestal but is nailed to the plywood foot.  This is shown in the photos below.


Both the top and bottom pedestal edges are finished with a pine trim.
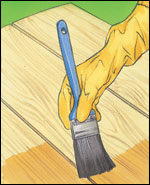
 

Step 15 - Finishing

The next step involves staining all surfaces that will be visible when the table is fully assembled.
All surfaces are given a sanding firstly with 120 grit sand paper and then secondly a rub with 220 grit sandpaper.  All surfaces and brushed and rub with a tack cloth to remove any dust.
Uneven staining is a common problem when staining softwoods like pine, thus the wood is first preconditioned to allow the stain to stain the wood more evenly.  The stain is allowed to dry, lightly sanded and rubbed with a tack cloth.  The wood is then given a coat of polyurethane.


Step 16 - Attaching the top pedestal to the plywood base

Once the polyurethane has dried you can now proceed to attach the top pedestal to the plywood base.
On the underside of the plywood base mark out a section in the middle and apply glue.  For extra security the top pedestal is screwed to the plywood wood base.


Step 17 - Cutting & gluing fabric in chip holder cut out

The table is assembled.  The octagon ring will give the correct positions for the batting and felt cut outs.  The method of securing the batting to the plywood base and then the felt to the batting is identical to the method used in step 13.


Once the fabric fitting is complete lay the octagon ring on top.


Step 18 - Ready to Play some Poker?

The table is ready for some fun nights of poker playing with friends or family.
 
 
I hoped that you have realised just how easy it is to make your own poker table.  I used some plans that I bought online and they were well worth it.  I have had many a fun night poker with my buddies, you can too.


How YOU can build your own bookcase - A step by step guide

In-the-wall bookcases are elegant, but they can be difficult and expensive to construct. We show you an easier way to create a classic piec...